- Not to be confused with a similar mechanic exclusive to Brave Frontier II called Xross Brave Burst.
Bonding is a mechanic introduced in the Version 2.0.0 Update of the Global version of Brave Frontier. Bonded units join together to unleash their Dual Brave Burst during combat to unleash a mighty power, an Elemental Synergy, in addition to their combined Ultimate Brave Bursts.
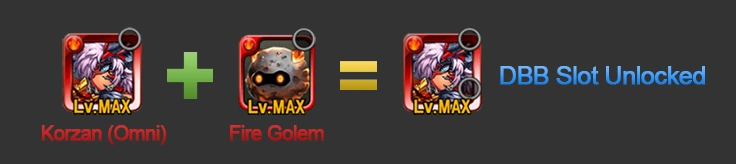
In order to unlock the ability for a unit to Bond with its partner, players must first fuse it with an Elemental Golem of the same element type. Doing this will now permanently unlock the unit’s DBB Slot, allowing it to become Bonded with its partner (Unit Pair) that has completed the same steps. Units must be at max level with SP Enhancements unlocked before Elemental Golems become able to be fused.
Bonding a unit[]
To Bond a Unit Pair, enter one of the unit’s Unit Menu and tap on its newly unlocked DBB Slot and select its partner.
")
")
")
")
")
")
DBB Progression System[]
The DBB Progression System is a mechanic introduced in the Version 2.1.0 Update, allowing Bonded Units to boost their Bond Level, effectively increasing the effectiveness of Bonded DBB Unit skills as well as improving Elemental Synergy effectiveness, increasing DBB effect duration, reducing Synergy Shard cost, and granting Bonded Units to use Bonded Super Brave Burst during Overdrive.
")
")
")
")
Orebi Golems can be upgraded from 4★ to 5★. These Greater Golems are used to upgrade Bond Level from 3 to 4.
")
")
Progression Table[]
Note that the effectiveness of each Bond Pair's Elemental Synergy effectiveness may differ.
| Bond Level | Enhancements |
|---|---|
| 1 |
|
| 2 |
|
| 3 |
|
| 4 |
|
| 5 |
|
| 6 |
|
Synergy Progression Requirements[]
This table lists the total materials required to get to the specified Bond Level for each Elemental Synergy.
| Bond Level | Requirements |
|---|---|
| 2 | |
| 3 | |
| 4 | |
| 5 | |
| 6 |
| Bond Level | Requirements |
|---|---|
| 2 | |
| 3 | |
| 4 | |
| 5 | |
| 6 |
| Bond Level | Requirements |
|---|---|
| 2 | |
| 3 | |
| 4 | |
| 5 | |
| 6 | |
| Bond Level | Requirements |
|---|---|
| 2 | |
| 3 | |
| 4 | |
| 5 | |
| 6 |
| Bond Level | Requirements |
|---|---|
| 2 | |
| 3 | |
| 4 | |
| 5 | |
| 6 |
| Bond Level | Requirements |
|---|---|
| 2 | |
| 3 | |
| 4 | |
| 5 | |
| 6 |
| Bond Level | Requirements |
|---|---|
| 2 | |
| 3 | |
| 4 | |
| 5 | |
| 6 |
| Bond Level | Requirements |
|---|---|
| 2 | |
| 3 | |
| 4 | |
| 5 | |
| 6 |
| Bond Level | Requirements |
|---|---|
| 2 | |
| 3 | |
| 4 | |
| 5 | |
| 6 |
| Bond Level | Requirements |
|---|---|
| 2 | |
| 3 | |
| 4 | |
| 5 | |
| 6 | |
| Bond Level | Requirements |
|---|---|
| 2 | |
| 3 | |
| 4 | |
| 5 | |
| 6 |
| Bond Level | Requirements |
|---|---|
| 2 | |
| 3 | |
| 4 | |
| 5 | |
| 6 |
| Bond Level | Requirements |
|---|---|
| 2 | |
| 3 | |
| 4 | |
| 5 | |
| 6 |
| Bond Level | Requirements |
|---|---|
| 2 | |
| 3 | |
| 4 | |
| 5 | |
| 6 |
| Bond Level | Requirements |
|---|---|
| 2 | |
| 3 | |
| 4 | |
| 5 | |
| 6 |
| Bond Level | Requirements |
|---|---|
| 2 | |
| 3 | |
| 4 | |
| 5 | |
| 6 |
| Bond Level | Requirements |
|---|---|
| 2 | |
| 3 | |
| 4 | |
| 5 | |
| 6 |
Synergy Shards[]
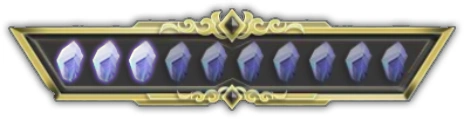
Synergy Shards are used during combat to power their Dual Brave Burst. One (1) Synergy Shard is gained at the end of every 5th turn when a Bonded Unit is present in the squad, at the end of each turn when a Bonded Unit is in Overdrive (up to 4 shards per Overdrive), or whenever UBB is used. The player can hold a maximum of 10 Synergy Shards at a time, which carries over to the next battle but not to the next mission.
As of June 6, 2019, 1 Synergy Shard is gained upon using UBB, regardless if the unit is a Bonded Unit or not. Note that even if the UBB is recasted using a recast buff, only 1 Synergy Shard is gained.
Examples of gaining Synergy Shards:
- 1 Synergy Shard is gained at the end of turns 5, 10, 15, 20, 25, etc.
- 2 Synergy Shards are gained at the end of turns multiple of 5 when a Bonded Unit is in Overdrive.
- 0 Synergy Shards are gained at the end of turn 4 when a non-Bonded Unit is in Overdrive.
- 1 Synergy Shard is gained upon using UBB, but can only fill the Synergy Gauge once per turn.
Bonded Brave Burst[]
Bonded Brave Burst (abbreviated as BBB) is a type of Brave Burst that can be executed while a Bonded Unit is in Overdrive. Bonded Brave Bursts can be executed freely without having to fill up a gauge for it as long as the Bonded Unit is in Overdrive. Additionally, the squad only requires at least one of the units in the Bonded Pair to be in the squad to execute Bonded Brave Burst.
A Bonded Unit's Bonded Brave Burst is the Brave Burst of the unit's partner in the Bonded Pair. Extra Skills, SP Enhancements, and other buff and passive effects of the partner are not counted towards the Bonded Brave Burst.
To activate Bonded Brave Burst, the player swipes left on a Bonded Unit that is in Overdrive.
Examples of Bonded Brave Burst:
- While Xenon, Son of Elysia is in Overdrive, he can use Estia, Regalia of Elysia's Brave Burst (Baldr's Blaze) using Xenon's own element and parameters, dealing Dark damage instead of Light.
- While Estia, Regalia of Elysia is in Overdrive, she can use Xenon, Son of Elysia's Brave Burst (Spirit Sunder) using Estia's own element and parameters, dealing Light damage instead of Dark. Even if Xenon took the "Adds enormous BB Atk boost for 3 turns effect to BB/SBB" SP Enhancement, Estia cannot boost BB Atk of all allies using Bonded Brave Burst.
Bonded Super Brave Burst (abbreviated as BSBB) can also be used in addition to Bonded Brave Burst, which is also the Super Brave Burst of the unit's partner in the Bonded Pair. The Bonded Pair must reach Bond Level 4 to unlock Bonded Super Brave Burst. The same rules to Bonded Brave Burst apply to Bonded Super Brave Burst, allowing BSBB to be freely used while the Bonded Unit is in Overdrive. To execute BSBB, the player swipes right on the Bonded Unit that is in Overdrive.
Bonded Brave Burst and Bonded Super Brave Burst are in the same category of buffs as Brave Burst and Super Brave Burst. As such, buffs of the same type from these sources do not stack with each other.
Bonded Brave Burst and Bonded Super Brave Burst cannot be affected by the negative effects of Curse and Amnesia.
Dual Brave Burst[]
Dual Brave Burst (abbreviated as DBB) is a type of Brave Burst that can be executed once a sufficient amount of Synergy Shards have been gathered to activate a Dual Brave Burst. The only units in combat that can use Dual Brave Burst are those who have Bonded with their partner (displayed as a blue frame surrounding the unit bar). Additionally, the squad only requires at least one of the units in the Bonded Pair to be in the squad to execute Dual Brave Burst.
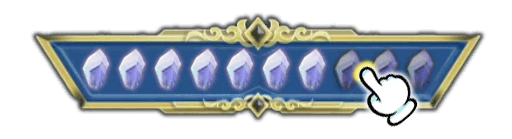
To activate Dual Brave Burst, the player taps on the Synergy Gauge once enough Synergy Shards are accumulated and swipes up on the desired Bonded Unit.
Buffs from Dual Brave Burst cannot stack with buffs from Ultimate Brave Burst. As such, UBB and DBB buffs can overwrite each other with the most recently activated buff taking precedence.
NOTE:
- DBB does not apply to Friend/Reinforcement units, unless the unit was selected from the player's inventory through Frontier Gate, Frontier Rift, Frontier Spire or Summoners' Training Ground.
- Inflicting Paralysis on all foes on the field will prevent the usage of DBB for the rest of the current turn and the next turn. This issue will remain until the Paralysis debuff disappears and a foe had performed an action for the turn.
")
")
Multi-Bond[]
How do I bond multiple partners to a certain unit?
Similar to the original Dual Brave Burst, players must first fuse an Elemental Golem to all eligible units in order to unlock the DBB slots.
To Bond a Unit Pair, enter one of the unit’s Unit Menu and tap on its DBB Slot. Doing so will open up the Unit Bond Menu. Tap on “Bond Unit” to proceed.
")
")
How do I boost the bonds of a certain pairing?
Select the bond partner that you wish to upgrade the DBB bonds of by tapping on their respective unit banner. Thereafter, the ‘Boost’ button will be activated for use.
")
Tap on the “Boost” button enter the Bond Level Boost Menu. With the right materials, upgrade the pairing’s DBB bonds and improve their elemental synergy!
Pair up with different bond partners and choose an Energy Synergy that best suits your squad’s needs.
Elemental Synergy[]
- See also List of Units with Elemental Synergy.
Elemental Synergy is an effect that is specific to the two elements that are bonded together. Each pair of elements has an Elemental Synergy that can be improved the higher the Bond Level.
| Elemental Synergy | Required Elements |
Effect |
|---|---|---|
| Abyss | Deals piercing max HP% DoT to single Light foe | |
| Aurora | Deals piercing max HP% DoT to single Dark foe | |
| Blast | Deals piercing max HP% damage to single foe, raises allies from KO, grants Invincibility but inflicts KO on all allies on effect end (available when foe HP is below certain amount) | |
| Blaze | Deals piercing max HP% DoT to single Earth foe | |
| Cyclone | Chance to negate KO resistance effects | |
| Eruption | Chance to negate Purge effects | |
| Magma | Chance to negate BB and OD Drain effects | |
| Miasma | Reduces healing effectiveness of single foe | |
| Mist | Chance to purge and negate Amnesia effect & reduces BB activation cost | |
| Obsidian | Refills consumable items by certain amount (limited activation per battle) | |
| Nova | Chance to purge and negate Lock effects | |
| Plasma | Deals piercing max HP% DoT to single Water foe | |
| Prism | Deals piercing max HP% damage to single foe and boosts offense but self-KO until battle end (available when foe HP is below certain amount) | |
| Pyre | Chance to purge and negate Doom and Ennui effects | |
| Quagmire | Purges Barrier and Shield effects & activates non-elemental Shield | |
| Radiance | Chance to purge and negate HP and Heal reduction effects | |
| Steam | Boosts DBB Synergy Shards (available when cooldown count is 0) | |
| Tempest | Chance to purge and negate Turn Skip | |
| Tsunami | Deals piercing max HP% DoT to single Fire foe | |
| Tremor | Deals piercing max HP% DoT to single Thunder foe | |
| Twilight | Boosts max HP relative to Rec and raises max HP limit |